Free Pixel Art Backgrounds with Parallax Layers (CC0)
November 13, 2026 · 8 min read
Six free CC0 pixel art backgrounds, each four 384 by 216 parallax layers, with layer speeds, whole number scaling and setups for Godot 4, Unity and Phaser.
SpritePilot now has six free pixel art backgrounds for platformers and side scrollers: Forest, Desert, Cave, Night City, Snow Mountains and Ocean Beach. Each scene comes as four layers (sky, far, middle and near) that you scroll at different speeds to get depth, and every layer repeats sideways without a seam. They are released under CC0, so you can use them in any game, commercial or not, without giving credit. Below you'll find how parallax scrolling works, which speeds to use, how to scale 384 by 216 pixels up to a full screen without blurring, and setups for Godot 4, Unity and Phaser 3.
What's in the pack
| Scene | What you see |
|---|---|
| Forest | Pine and broadleaf woods under misty lavender mountains, big trunks and bushes in front |
| Desert | Red rock country at golden hour: mesas, a natural arch, dunes and cacti |
| Cave | A crystal cavern: misty rock columns, glowing crystals and mushrooms, stalactites in front |
| Night City | A starry sky, a hazy skyline full of lit windows, a rooftop with lamps in front |
| Snow Mountains | Snowy peaks, a forest of snow laden pines, deep drifts in front |
| Ocean Beach | Open sea with islands, rolling waves, palm trees and sand in front |
Every layer is a PNG of 384 by 216 pixels, a 16:9 screen. The sky is opaque and fills the screen; the other three layers are transparent around their shapes, and every pixel is either fully opaque or fully transparent, so edges never pick up a dark fringe. Each scene folder also has the four layers stacked into one PNG, the same at 4x for a quick look, and a GIF preview. Download one scene or all six in one ZIP.
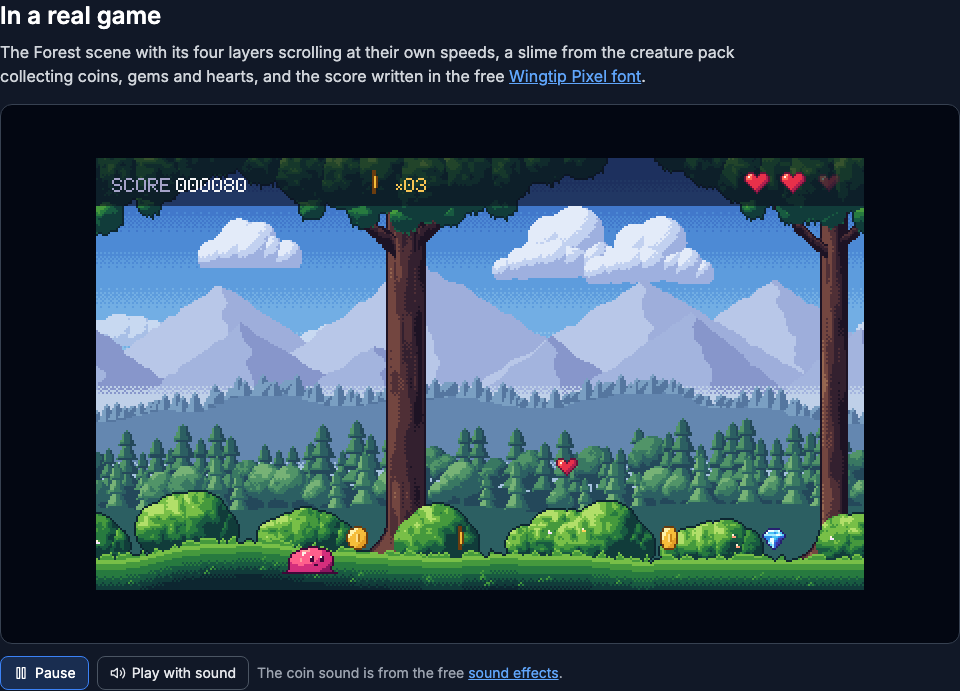
The page shows every scene moving, lets you change the speed, and has a Show the layers button that pulls a scene apart so you can see what each layer holds. The demo on top uses a slime from the creature pack and the Wingtip Pixel font for the score.
How parallax scrolling works
When you look out of a train window, the fence next to the track rushes past, the trees behind it move more slowly, and the mountains barely move at all. Parallax scrolling copies that: each layer moves by the camera's movement times its own factor.
| Layer | Factor | Moves when the camera moves 100 px |
|---|---|---|
| 1 Sky | 0 | 0 px: it stays put on screen |
| 2 Far | 0.2 | 20 px |
| 3 Middle | 0.5 | 50 px |
| 4 Near | 1.0 | 100 px: it moves with the ground |
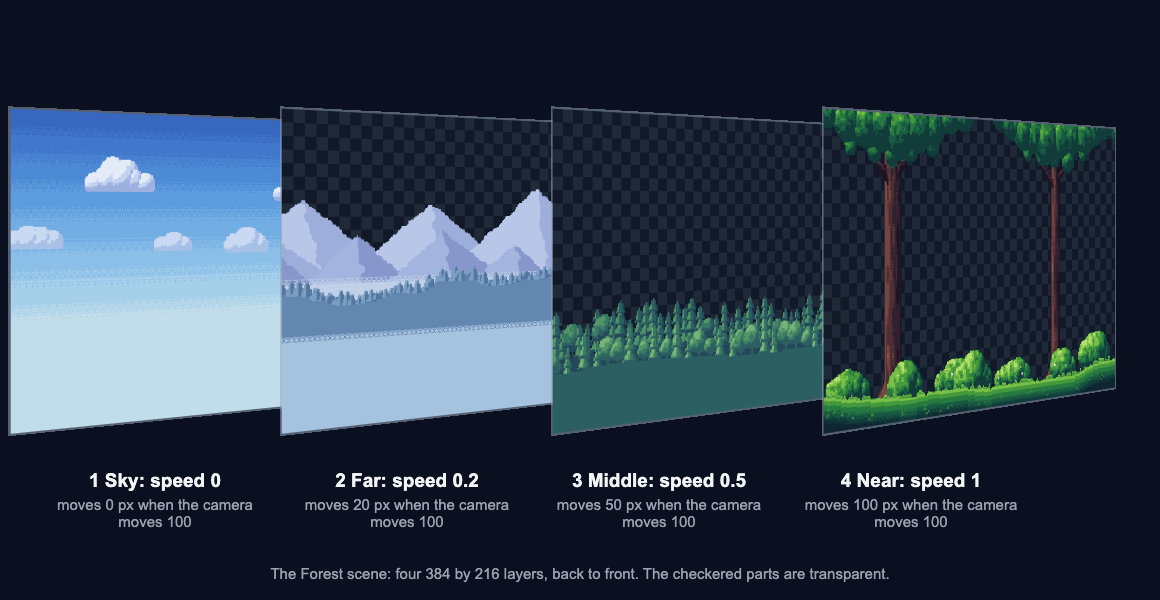
These are the speeds the page uses, and they suit all six scenes. If the front layer feels too busy, try 0.8 for it. Your level's ground and characters move at 1.0, so a near layer at 1.0 feels attached to them.
Because every layer is 384 pixels wide and repeats, a layer's position on screen only ever needs to be the camera position times the factor, wrapped every 384 pixels. Each engine below does that wrapping for you or in two lines of code. The layers don't repeat vertically, so if your camera also moves up and down, keep it within the 216 pixels or give the layers a vertical factor of 0 so they stay put.
Scale by whole numbers
384 by 216 is small on purpose. It multiplies cleanly into the common screens: 3x is 1152 by 648, 5x fills 1920 by 1080 exactly and 10x fills 3840 by 2160. The rule is to render the game at 384 by 216 and scale the whole picture by a whole number with nearest neighbor filtering (Unity calls it Point, Godot calls it Nearest).
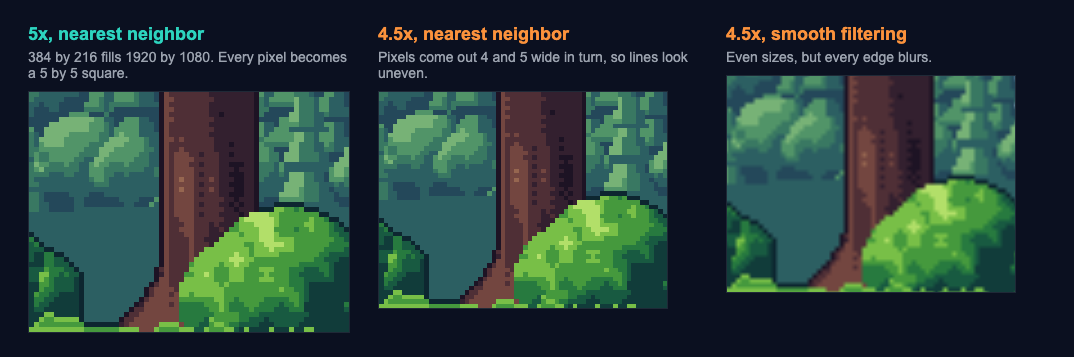
A 2560 by 1440 screen isn't a whole multiple: 6x gives 2304 by 1296 with a thin border, which looks better than stretching to 6.67x. The guide to scaling pixel art without blur explains both halves of the problem in detail.
Godot 4
Godot 4.3 added the Parallax2D node, and the current class reference marks the older ParallaxBackground as deprecated in its favor. Build one Parallax2D per layer, sky first, each with a Sprite2D child:
Level (Node2D)
  Sky (Parallax2D)       Scroll Scale (0, 1)     Repeat Size (384, 0)
    Sprite2D             forest-1-sky.png, Centered off
  Far (Parallax2D)       Scroll Scale (0.2, 1)   Repeat Size (384, 0)
    Sprite2D             forest-2-far.png, Centered off
  Middle (Parallax2D)    Scroll Scale (0.5, 1)   Repeat Size (384, 0)
    Sprite2D             forest-3-middle.png, Centered off
  Near (Parallax2D)      Scroll Scale (1, 1)     Repeat Size (384, 0)
    Sprite2D             forest-4-near.png, Centered off
  Player
    Camera2D
Scroll Scale is the factor: per the docs, 1 scrolls with the camera and 0 stops the layer completely. Repeat Size (384, 0) repeats the texture every 384 pixels sideways and not at all vertically. Turn Centered off on each Sprite2D: the parallax tutorial says the repeat area starts at (0, 0) and grows down and to the right, so a centered texture only covers part of it. If your camera zooms out, set Repeat Times to 3, which the tutorial suggests for that case. If the camera moves vertically and you want the layers to stay put on screen, use 0 for the second value of Scroll Scale.
For sharp pixels, set Display > Window > Size to 384 by 216, Stretch > Mode to viewport and Stretch > Scale Mode to integer (available since Godot 4.2), and Rendering > Textures > Canvas Textures > Default Texture Filter to Nearest.
On Godot 4.0 to 4.2, use a ParallaxBackground with one ParallaxLayer per layer instead: Motion Scale (factor, 1) and Motion Mirroring (384, 0). We checked these settings against the Godot 4 documentation (the Parallax2D class reference, the 2D parallax tutorial and the multiple resolutions page); we did not run them in the editor.
Unity
Import each PNG with Texture Type Sprite (2D and UI), Pixels Per Unit 16 (or whatever the rest of your art uses), Filter Mode Point (no filter), Compression None and Mesh Type Full Rect. Give each layer a Sprite Renderer with Draw Mode Tiled and a width of three copies (3 × 384 / 16 = 72 units), and order them back to front with Order in Layer 0 to 3. Then add this script to each layer:
using UnityEngine;

public class ParallaxLayer : MonoBehaviour
{
    public float speed = 0.5f;          // sky 0, far 0.2, middle 0.5, near 1
    public float pixelsPerUnit = 16f;   // the same as the sprite's import setting

    Transform cam;
    float startX;

    void Start()
    {
        cam = Camera.main.transform;
        startX = transform.position.x;
    }

    void LateUpdate()
    {
        float width = 384f / pixelsPerUnit;                    // one copy of the layer, in units
        float x = startX + cam.position.x * (1f - speed);      // follow the camera by 1 minus speed
        x += Mathf.Round((cam.position.x - x) / width) * width; // hop whole widths to stay under the camera
        transform.position = new Vector3(x, transform.position.y, transform.position.z);
    }
}
The factor looks inverted here because the layer lives in the world, not on the screen: a layer that follows the camera completely (1 minus 0) seems to stand still, like the sky, and one that doesn't follow it at all (1 minus 1) moves past like the ground. The last line moves the layer by whole widths, which you can't see because the copies are identical, so the three copies always cover the view.
We compiled this script in Unity 6.3 and tested it in batch mode with the Forest layers imported as above. A test placed the four layers, moved the camera to six positions from minus 55.5 to 1000 units and called each layer's LateUpdate (directly, in edit mode, not in Play mode). At every position each layer's pattern sat exactly where camera × speed puts it on screen, and each layer still covered the whole view.
For crisp pixels, add a Pixel Perfect Camera with Asset Pixels Per Unit 16 and Reference Resolution 384 by 216. It is part of URP (the Universal 2D template includes it); the separate 2D Pixel Perfect package is for the Built-in Render Pipeline. For animating characters in front of the scene, see Unity sprite sheet animation.
Phaser 3
The obvious tool in Phaser is a tileSprite with tilePositionX = scrollX * factor, and in Canvas mode it works perfectly. In WebGL, which most browsers use, there is a catch that Phaser's own documentation describes: a tileSprite whose texture isn't a power of two in size gets redrawn into one, so our 384 by 216 layers become 512 by 256 and pick up soft edges. We measured it: with WebGL, about 7,900 of the 82,944 pixels on screen came out visibly different from the original art, all along the edges of shapes.
Two plain images per layer, moved by hand, avoid the problem:
const W = 384   // every layer is 384 by 216 and repeats sideways
const LAYERS = [
  { key: 'sky', file: 'forest/forest-1-sky.png', factor: 0 },
  { key: 'far', file: 'forest/forest-2-far.png', factor: 0.2 },
  { key: 'middle', file: 'forest/forest-3-middle.png', factor: 0.5 },
  { key: 'near', file: 'forest/forest-4-near.png', factor: 1 },
]

class Level extends Phaser.Scene {
  preload() {
    for (const layer of LAYERS) this.load.image(layer.key, layer.file)
  }

  create() {
    // two copies of each layer side by side, fixed to the screen; the sky first
    this.layers = LAYERS.map(layer => ({
      factor: layer.factor,
      copies: [0, W].map(x => this.add.image(x, 0, layer.key).setOrigin(0, 0).setScrollFactor(0)),
    }))
    this.cameras.main.setBounds(0, 0, 10 * W, 216)   // a level ten screens wide
    // add the player here, then this.cameras.main.startFollow(player)
  }

  update() {
    const scrollX = this.cameras.main.scrollX
    for (const layer of this.layers) {
      const x = -Phaser.Math.Wrap(scrollX * layer.factor, 0, W)
      layer.copies[0].x = x
      layer.copies[1].x = x + W
    }
  }
}

new Phaser.Game({
  type: Phaser.AUTO,
  width: W,
  height: 216,
  pixelArt: true,
  scale: { zoom: Phaser.Scale.MAX_ZOOM },
  scene: Level,
})
We ran this scene with Phaser 3.90 in Chromium (Canvas renderer and WebGL) and WebKit (WebGL). At camera positions from 0 to the end of the level, we compared the game's pixels with the four PNGs layered by hand at the expected offsets. With WebGL, both browsers matched exactly wherever the offsets were whole pixels. Where a factor gives a fraction (0.2 × 3456 is 691.2), Phaser rounds the layer to a whole pixel, so it can sit one pixel from where you'd round it yourself; nothing blurs. The Canvas renderer gave the same result, apart from one stray pixel in a few frames. MAX_ZOOM picked 3 for a 1280 by 720 window, once the page body had a height (html, body { height: 100% }); without one it stays at 1. For loading the player's sprite sheet, see Phaser sprite sheets and atlases.
Use them anywhere
All six scenes are CC0 1.0: use them in commercial or personal games, videos and apps, change them, and share or sell what you make with them, without asking and without credit. A link to SpritePilot is always welcome, never required.
See all six scenes move. For the rest of your game, the Wingtip Pixel font, the sound effects and the other free game assets use the same license. If you ever see thin lines between copies of a layer in your engine, why lines appear between your tiles covers the causes.