How to Scale Pixel Art Without Blurring It
October 14, 2026 · 7 min read
Why scaled pixel art turns blurry or lumpy, and how to keep it crisp with nearest-neighbor, whole-number scales, CSS, canvas and engine settings.
Open the tool from this article — free, in your browser, no signup.
You scale a 32-pixel sprite up to fill the screen and it comes out soft and blurry. Or it stays sharp but looks lumpy, with some pixels fatter than others. These are two different problems with two different fixes: the resampling method decides whether the result blurs, and the scale factor decides whether every pixel ends up the same size. Get both right and your art looks exactly as drawn, at any size.
Why scaled pixel art goes blurry
When an image is drawn bigger than it is, the computer has to invent the new pixels. There are two basic ways to do it:
- Smooth (bilinear) scaling blends neighboring pixels according to how close they are. That suits photos, but on pixel art it softens every edge and creates in-between colors that you never drew.
- Nearest-neighbor scaling copies the closest source pixel. Every pixel becomes a solid block and no new colors appear.
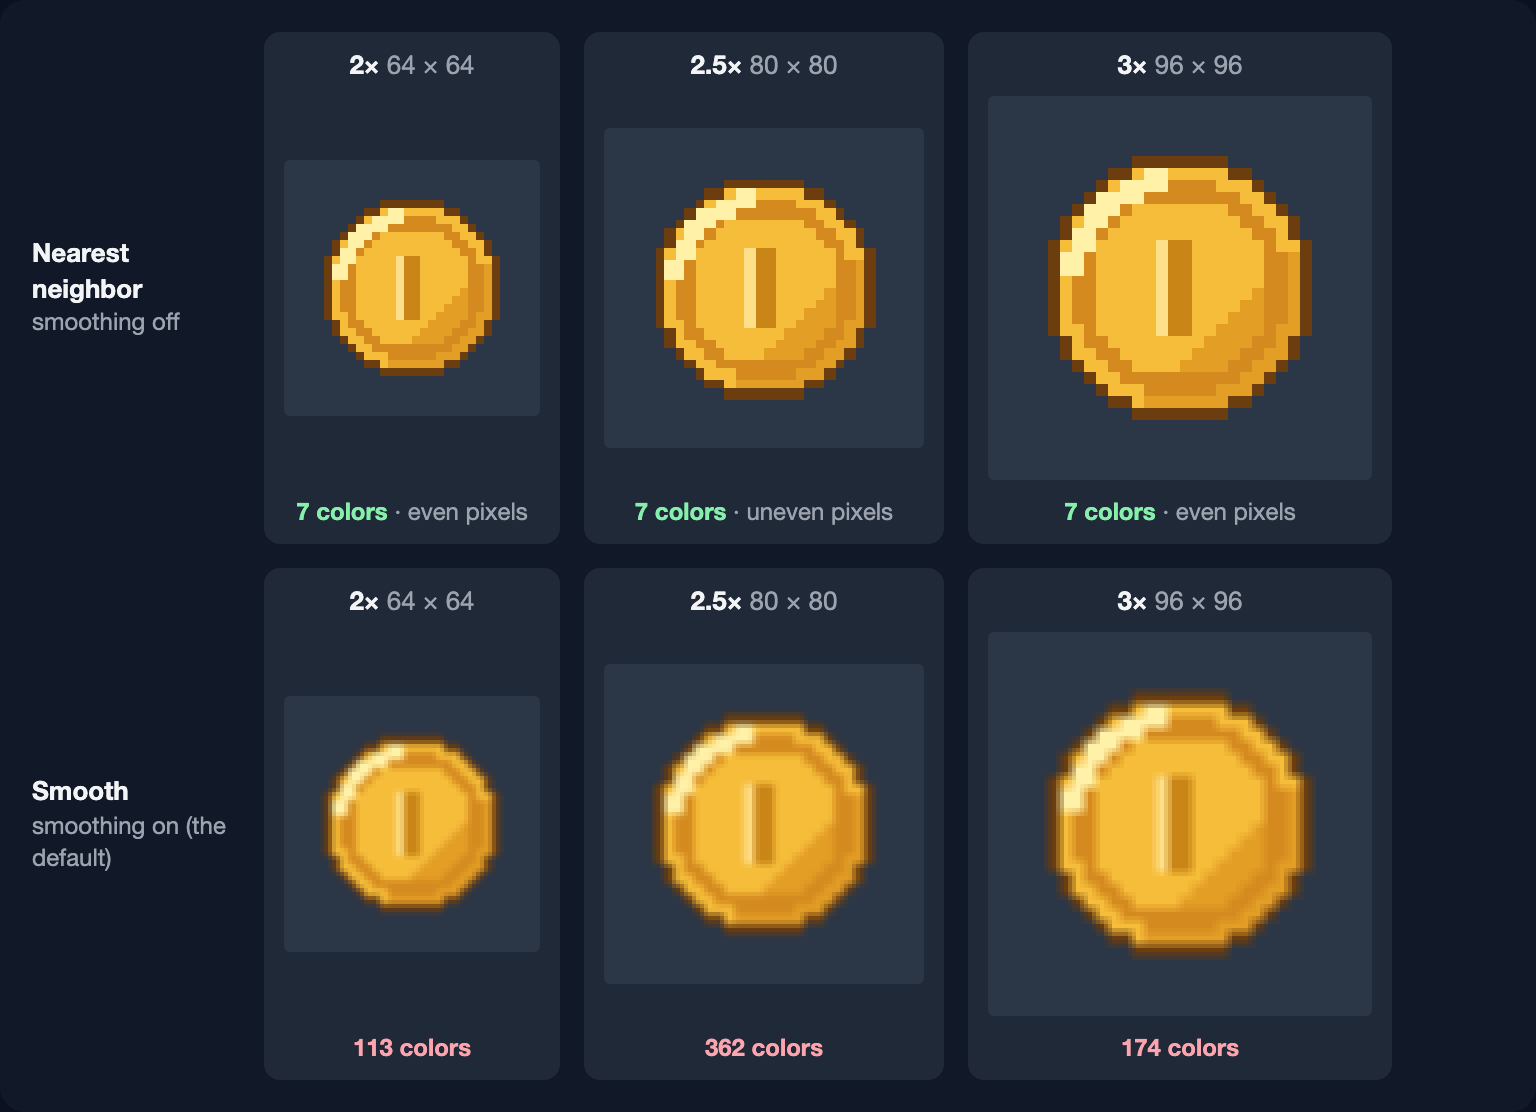
Smooth is usually the default: a canvas's imageSmoothingEnabled starts out true, and Phaser smooths until you set pixelArt: true. For pixel art you want nearest-neighbor everywhere — in the browser, in the engine, and in any tool that resizes your files.
Whole-number scales keep every pixel the same size
Nearest-neighbor fixes the blur, not the size. At 2× each source pixel becomes a 2 × 2 block, and at 3× a 3 × 3 block. At 2.5× a pixel can't be two and a half screen pixels wide, so the columns alternate between 3 and 2:
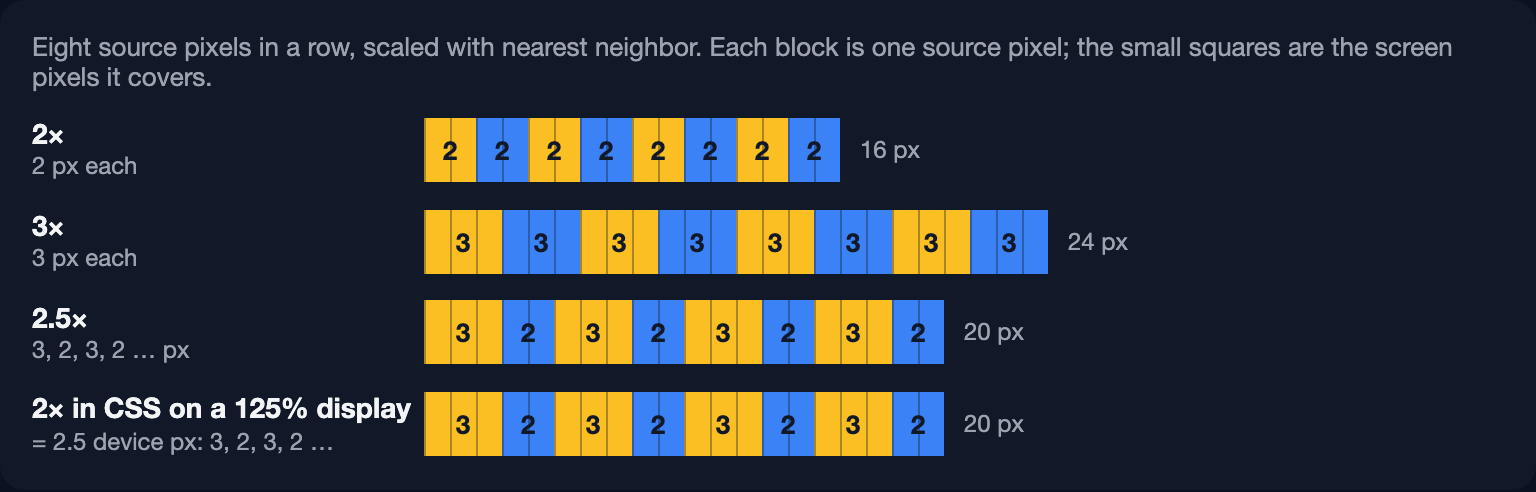
On a sprite, that makes one-pixel outlines thicker in some places than others and turns curves lumpy. When the sprite moves, the wide and narrow columns move across it, so the art seems to wobble. The fix is to scale by whole numbers only — 2×, 3×, 4× — and fill any leftover screen with a border.
That's the appeal of base resolutions like 320 × 180 and 640 × 360: they multiply evenly into common screens.
| Screen | 320 × 180 base | 640 × 360 base |
|---|---|---|
| 1280 × 720 | 4× | 2× |
| 1366 × 768 | 4× (1280 × 720, with a 43 px border left and right, 24 px top and bottom) | 2× |
| 1920 × 1080 | 6× | 3× |
| 2560 × 1440 | 8× | 4× |
| 3840 × 2160 | 12× | 6× |
In the browser: image-rendering: pixelated
For an image on a web page, one CSS property switches the browser to nearest-neighbor:
<img src="coin.png" width="96" height="96" alt="Coin" class="pixel-art">.pixel-art {
image-rendering: pixelated;
}That's a 32-pixel coin shown at exactly 3×. In a test in Chromium, every screen pixel came out identical to its source pixel; without the property the same image had 280 colors. MDN's image-rendering page lists support for pixelated since Chrome 41, Firefox 93 and Safari 10. Don't rely on crisp-edges for the same job: Chrome only added it in version 148, and the Chromium 145 we tested still smoothed it.
The CSS specification allows pixelated to add a little smoothing when the size isn't a whole multiple; Chromium 145 didn't, and drew plain 3- and 2-pixel columns at 2.5×. Either way, a fractional scale can't be both sharp and even.
Watch out for display scaling. CSS pixels aren't screen pixels. On a laptop with display scaling at 125%, window.devicePixelRatio is typically 1.25, so an image drawn at 2× in CSS covers 2.5 screen pixels per source pixel — the uneven pattern again, even though your CSS says 2×. At 150%, the same 2× happens to be an even 3.
In a canvas game: draw small, then scale by whole screen pixels
The reliable way to get crisp pixels in a canvas game is to draw everything at the game's base resolution, then scale the whole canvas up by the largest whole number of screen pixels that fits:
#game {
  image-rendering: pixelated;
}
const GAME_W = 320
const GAME_H = 180
const canvas = document.getElementById('game')
const ctx = canvas.getContext('2d')
canvas.width = GAME_W
canvas.height = GAME_H
ctx.imageSmoothingEnabled = false
// The largest whole-number scale that fits the window, in device pixels
function fit() {
const dpr = window.devicePixelRatio || 1
const scale = Math.max(1, Math.floor(Math.min(
(window.innerWidth * dpr) / GAME_W,
(window.innerHeight * dpr) / GAME_H,
)))
canvas.style.width = (GAME_W * scale) / dpr + 'px'
canvas.style.height = (GAME_H * scale) / dpr + 'px'
}
window.addEventListener('resize', fit)
fit()We ran this at device pixel ratios of 1, 1.25, 1.5, 1.75 and 2 and measured the screenshots: every game pixel covered the same number of screen pixels in every case. A version that worked out the scale in CSS pixels instead gave uneven columns at some window sizes: 3 and 2 screen pixels at 125%, 5 and 4 at 150%, 5 and 6 at 175%.
Three details that bite:
- Set
imageSmoothingEnabledagain after resizing the canvas. The HTML standard resets the context's state whenever the canvas's width or height is set; in our test the property went fromfalseback totrue. - Round positions. With smoothing on, drawing the coin at x = 10.5 blurred it into 18 colors. With smoothing off, Chromium drew it exactly as at x = 11 — but
Math.round(x)makes that your choice, not the browser's. - Draw sprites at 1× inside the small canvas. The canvas scale does the enlarging, once, for everything.
In game engines
The texture filter settings for each engine are covered in Why Lines Appear Between Your Tiles: Nearest in Godot, Point in Unity, pixelArt: true in Phaser. For whole-number scaling:
- Godot 4.2+: Project Settings → Display → Window → Stretch: set Mode to
viewportand Scale Mode tointeger. The documentation explains that this rounds the scale factor down to a whole number and fills the rest of the window with black bars. - Unity: add the Pixel Perfect Camera (URP) and set Asset Pixels Per Unit to your sprites' value and Reference Resolution to your base resolution, such as 320 × 180. Unity's manual says it keeps pixel art "crisp and clear at different resolutions, and stable in motion".
- Phaser 3.16+: set the zoom to
Phaser.Scale.MAX_ZOOM, which picks the largest whole-number zoom that fits the parent element. It's worked out when the game starts, so callthis.scale.setMaxZoom()again when the window changes size.
const config = {
  type: Phaser.AUTO,
  width: 320,
  height: 180,
  pixelArt: true,
  scale: {
    mode: Phaser.Scale.NONE,
    zoom: Phaser.Scale.MAX_ZOOM,
  },
  scene: [GameScene],
}
Scaling down is a different problem
Shrinking pixel art has no good automatic answer. Nearest-neighbor at 50% keeps every other row and column and throws the rest away: on the coin, the one-pixel outline vanished from long stretches of the edge. Smooth shrinking keeps a hint of everything but blurs it, turning the coin's 7 colors into 24.
So:
- If you need a smaller sprite, draw it. By hand you decide which details survive; an algorithm can't tell an eye from a speck.
- If the art was enlarged by a whole number, shrink it by exactly that number. A coin scaled up 3× with nearest-neighbor and back down to a third came out identical to the original, pixel for pixel. It's also the fix for art you received already enlarged, such as a 4× preview image: count how many screen pixels one art pixel covers, scale back to 1×, and let the engine do the enlarging.
Batch-scale sprites in SpritePilot
SpritePilot's Advanced Processing resizes every sprite in your session at once. Load the sprites first — cut a sheet with Grid Slice in Sprite Detection, for example — then choose Scaling Mode → Custom Size, enter the target width and height, and keep Resampling on Pixel art: keep every pixel sharp.
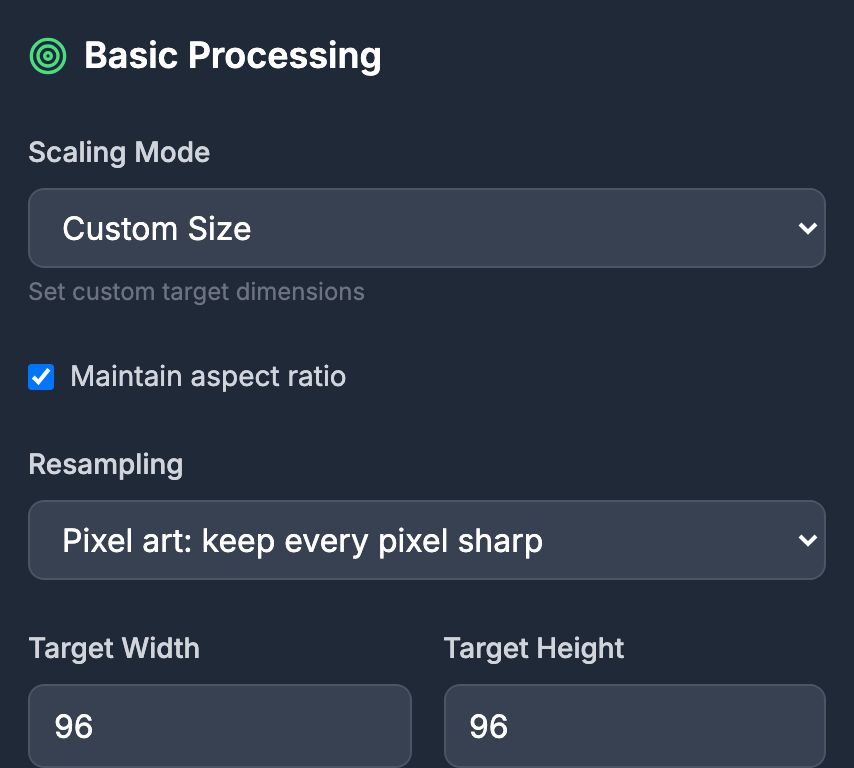
Pixel resampling is nearest-neighbor: every output pixel is a copy of a source pixel. We scaled the eight 32 × 32 coin frames to 96 × 96 and compared them with a perfect 3× enlargement: not one pixel differed. The Smooth option, meant for painted or photographic art, gave the same frame 651 colors. The results are saved as lossless PNG; Apply to Session passes them on to Export & Download, or Download ZIP saves them as files.
Two things to know:
- There's no "scale by 3×" field. You type the target size, so make it a whole multiple of the sprite size — 64, 96 or 128 for a 32-pixel sprite. Uniform and Smart scaling resize every sprite to the size of the smallest or largest one, which is rarely a whole-number factor.
- Leave Edge sharpening and Noise reduction off for pixel art; nearest-neighbor already gives you hard edges, and the tool itself labels noise reduction as not meant for pixel art.
A checklist
- Nearest-neighbor everywhere:
image-rendering: pixelated,imageSmoothingEnabled = false(again after every resize), Nearest or Point filtering in the engine. - Whole-number scales, measured in screen pixels — include
devicePixelRatioin the math. - A base resolution that divides common screens, such as 320 × 180 or 640 × 360.
- Whole-pixel positions for sprites and the camera.
- To shrink, redraw — or undo an enlargement by exactly its factor.