Import a Sprite Strip Into GameMaker and Play It
November 14, 2026 · 5 min read
Prepare an equal-cell PNG strip in SpritePilot, import it with GameMaker's strip filename convention, and check playback, origin, and collision bounds.
Open the tool from this article — free, in your browser, no signup.
To import an animated strip into GameMaker, put equal-size frames in one horizontal row and end the filename with _stripN.png, replacing N with the frame count. For the four-frame example here, use scout_strip4.png. Export the row without trimming, padding, or extrusion, then check the resulting subimages before assigning the sprite to an object.
This workflow follows GameMaker's current monthly manual. The SpritePilot slicing, export, and playback steps were run locally in Chromium. The GameMaker instructions and two-line GML example were checked against its official documentation; they have not been run in the engine.
Start with a strip whose dimensions you can explain
The original scout fixture contains four 32 × 32 cells. Its PNG is therefore 128 × 32, with poses ordered left to right. The character's boots stay on the same baseline, even when its arms and legs change position. Transparent space above the hat belongs to each frame and must survive export.
Download the source strip. It is deliberately small: four poses make it possible to inspect every transition, including the return from the last pose to the first. The two neutral poses are intentional; they separate the opposing steps. Do not delete a repeated pose simply because it resembles another frame.

The filename provides a count, not a frame width. GameMaker divides the strip width by that count. Here, 128 ÷ 4 = 32. Renaming this same file to _strip8 would ask for eight 16-pixel-wide slices. Renaming it to _strip2 would ask for two 64-pixel-wide slices. Neither change repairs the artwork. These are consequences of the documented strip convention.
Before exporting a different animation, write down three numbers: frame width, frame height, and frame count. Multiplying width by count should reproduce the strip width exactly. If it does not, investigate margins or gutters before going any further.
Make the actual export in SpritePilot
Open Grid Slice, choose Grid Slice, and load the source PNG. Set Columns to 4, Rows to 1, Margin to 0, and Spacing to 0. Turn off Skip empty (fully transparent) cells for this check, then slice. The result should contain four sprites, each labeled 32×32.
Now open Export & Download from the navigation. Use these settings:
| Setting | Value for this strip |
|---|---|
| Image Format | PNG |
| Sprite Sheet Layout | Horizontal Strip |
| Trim transparency | Off |
| Padding | 0 |
| Extrude | 0 |
| Export metadata file | Off |
Click Download Sprite Sheet. SpritePilot names the image sprite-sheet.png; rename that downloaded file to scout_strip4.png yourself. It does not append GameMaker's suffix automatically. No JSON file is needed for this import path.
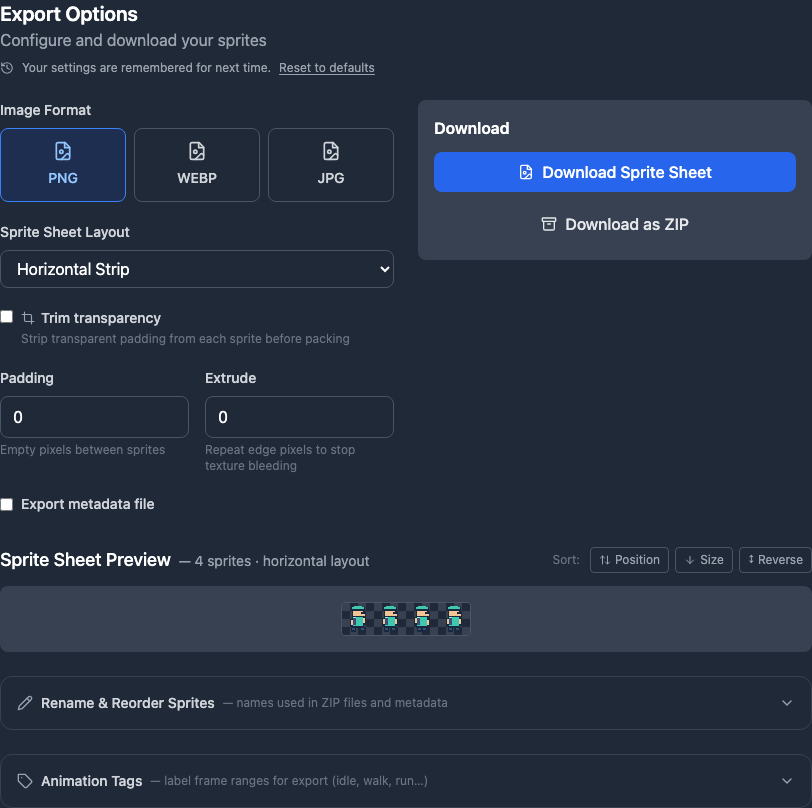
The screenshot shows the settings actually used. Small previews can hide spacing mistakes, so check the downloaded PNG as well. Keep an untouched copy of it before importing. That gives you a stable comparison if the engine preview looks different later.
The export format guide explains the other metadata choices. They solve other handoffs; this particular recipe depends on equal cells and a filename.
Preview the file you downloaded
Load the exported PNG into Sprite Player. Set Columns to 4, Rows to 1, Margin and Spacing to 0. Its readout should say 4 frames · 32×32 px each. Enable Grid overlay and check that each numbered box contains one complete scout.
Press Play, pause, and step through the frames with the next-frame button. Watch the hat, feet, and empty border. A disappearing arm suggests a cut crossed the artwork. A whole second character inside one cell suggests the count is too small. A correctly cut pose appearing at the wrong time suggests an ordering problem instead.
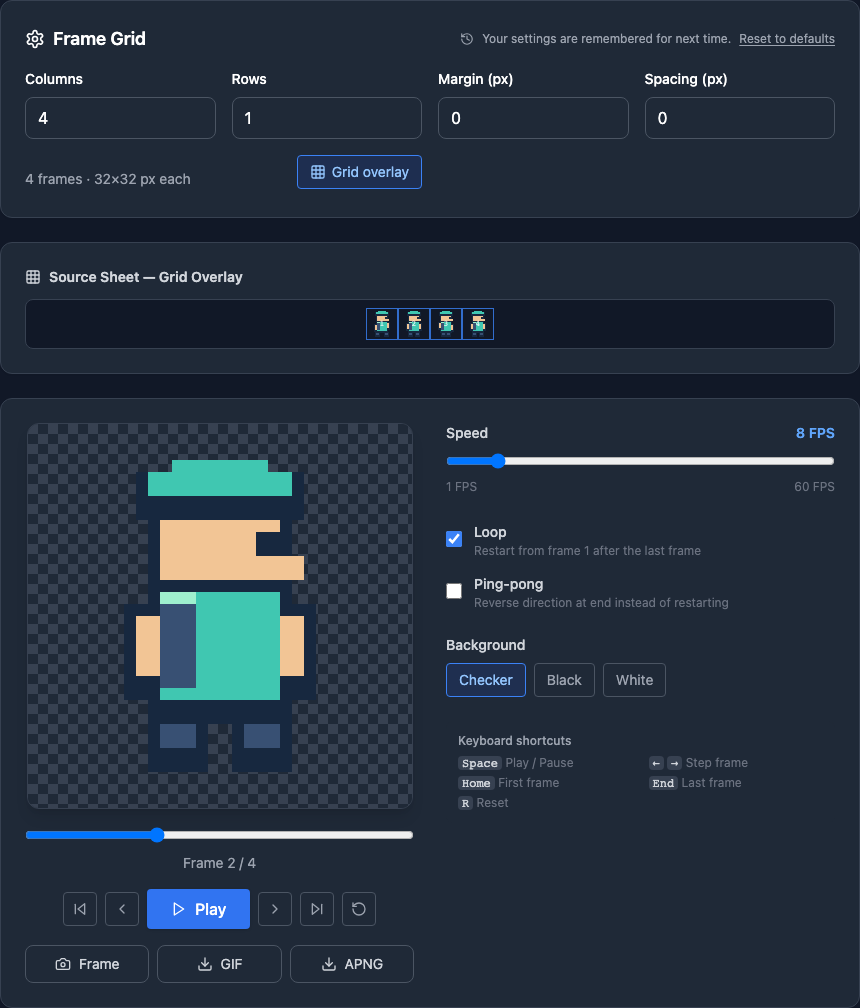
Use 8 FPS as a starting point for these four poses: one pass then takes half a second. That is an artistic choice for this fixture, not an import requirement. The animation preview guide covers the remaining controls.
Import, assign, and make a minimal room check
In GameMaker's Sprite Editor, use Import to select scout_strip4.png; dragging the file into the IDE is another documented route. Verify four subimages and 32 × 32 dimensions. The imported asset name drops the _strip4 suffix. Set Frame Speed to 8, using Frames per second.
Create an object such as obj_scout, select the imported sprite in its sprite box, and drag the object into a room to create an instance. Those assignment and placement steps follow the Object Editor manual. Start with one visible instance and no custom drawing code, so the test has few moving parts.
If you want explicit initialization, put this in that object's Create event:
image_index = 0;
image_speed = 1;
image_index selects the animation position. image_speed is a multiplier of the sprite's configured speed: 1 preserves it, and 0.5 halves it. The snippet is documentation-checked, not engine-tested.
Run your room and compare it with the browser preview. For the initial check, ask only whether the four poses cycle in the expected order. Add movement after that succeeds.
Set the anchor separately from collision bounds
In the Sprite Editor, the origin is the point placed at the instance's room position. Set it consistently across related sprites. For this fixture, the proposed origin is (16, 28), near the feet.
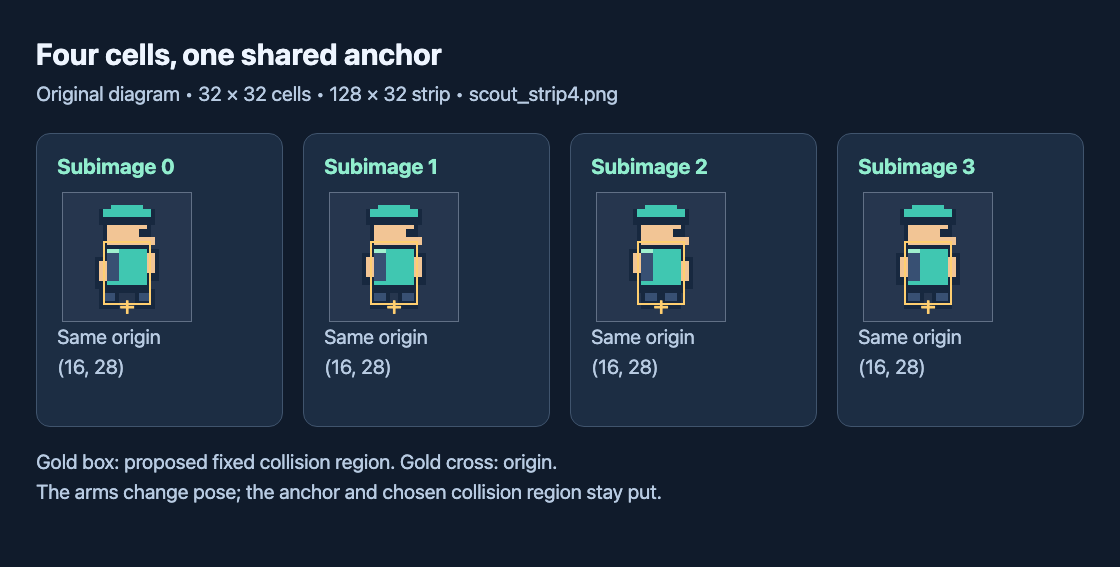
The diagram separates two choices. The cross answers where the picture attaches. The box answers which part should count for gameplay contact. In Collision Mask, GameMaker offers Manual bounds and a Rectangle type. A fixed body-sized rectangle is a useful starting proposal here; test its feel in your own game. Swinging arms need not enlarge the region that blocks passage through a doorway.
Diagnose the first failure before adding complexity
| Symptom | First check |
|---|---|
| Several poses appear side by side | Filename count versus actual cell count |
| Slices gradually cross the artwork | Padding, extrusion, or an unexpected outer border |
| Animation stays on one pose | Frame Speed, image_speed, and code assigning image_index repeatedly |
| Picture jumps while the instance stays still | Identical source canvases and origin coordinates |
Keep the minimal room until the import passes. Record the PNG dimensions, suffix count, speed, and origin beside the asset. Those details make later replacements repeatable. For another practice animation, use a strip from the creatures pack; for frame alignment problems, continue with sprite pivots.