Removing a Solid Background From Sprites Without a Halo
October 14, 2026 · 7 min read
Why removing a magenta or white background leaves a colored fringe around sprites, what tolerance can and can't fix, and how soft edges remove it.
Open the tool from this article — free, in your browser, no signup.
You remove the magenta background from an old sprite sheet, drop the sprites into your game, and every one of them has a thin purple outline that was never in the art. On a sheet with a white background it's a pale gray rim instead. That fringe is called a halo. It doesn't come from a wrong setting; it comes from the way the sprite's edges were drawn. Once you see where it comes from, it's easy to remove without damaging the sprites.
Why old sprites sit on magenta or white
Before every format and engine handled transparency per pixel, a common trick was a color key: one color that means "transparent". It still exists in libraries today. pygame's Surface.set_colorkey, for example, makes "any pixels that have the same color as the colorkey" transparent when the surface is drawn — the same color, exactly.
Magenta, (255, 0, 255), is the classic key because it almost never appears in the art itself. White backgrounds turn up in sheets exported for print or the web, and in screenshots. Either way, the job is to turn that one color into real transparency, and for crisp pixel art that is simple. The trouble starts with smooth edges.
Where the halo comes from
A smooth, anti-aliased edge is drawn with pixels that are only partly covered by the sprite. Their color is a mix of the sprite and whatever was behind it — the standard alpha compositing formula:
color = coverage × sprite color + (1 − coverage) × background color
Take an edge pixel that is 38% dark outline, (32, 32, 32), and 62% background. On magenta it was saved as 0.38 × 32 + 0.62 × 255 = 170 for red and blue, and 0.38 × 32 + 0.62 × 0 = 12 for green: (170, 12, 170), a purple pixel. On white, the same pixel is (170, 170, 170), a light gray.
A simple key removes pixels that are close to the background color and keeps everything else, fully opaque. (170, 12, 170) is 121 RGB units away from magenta, so it stays — as a solid purple pixel around a sprite that no longer sits on magenta.
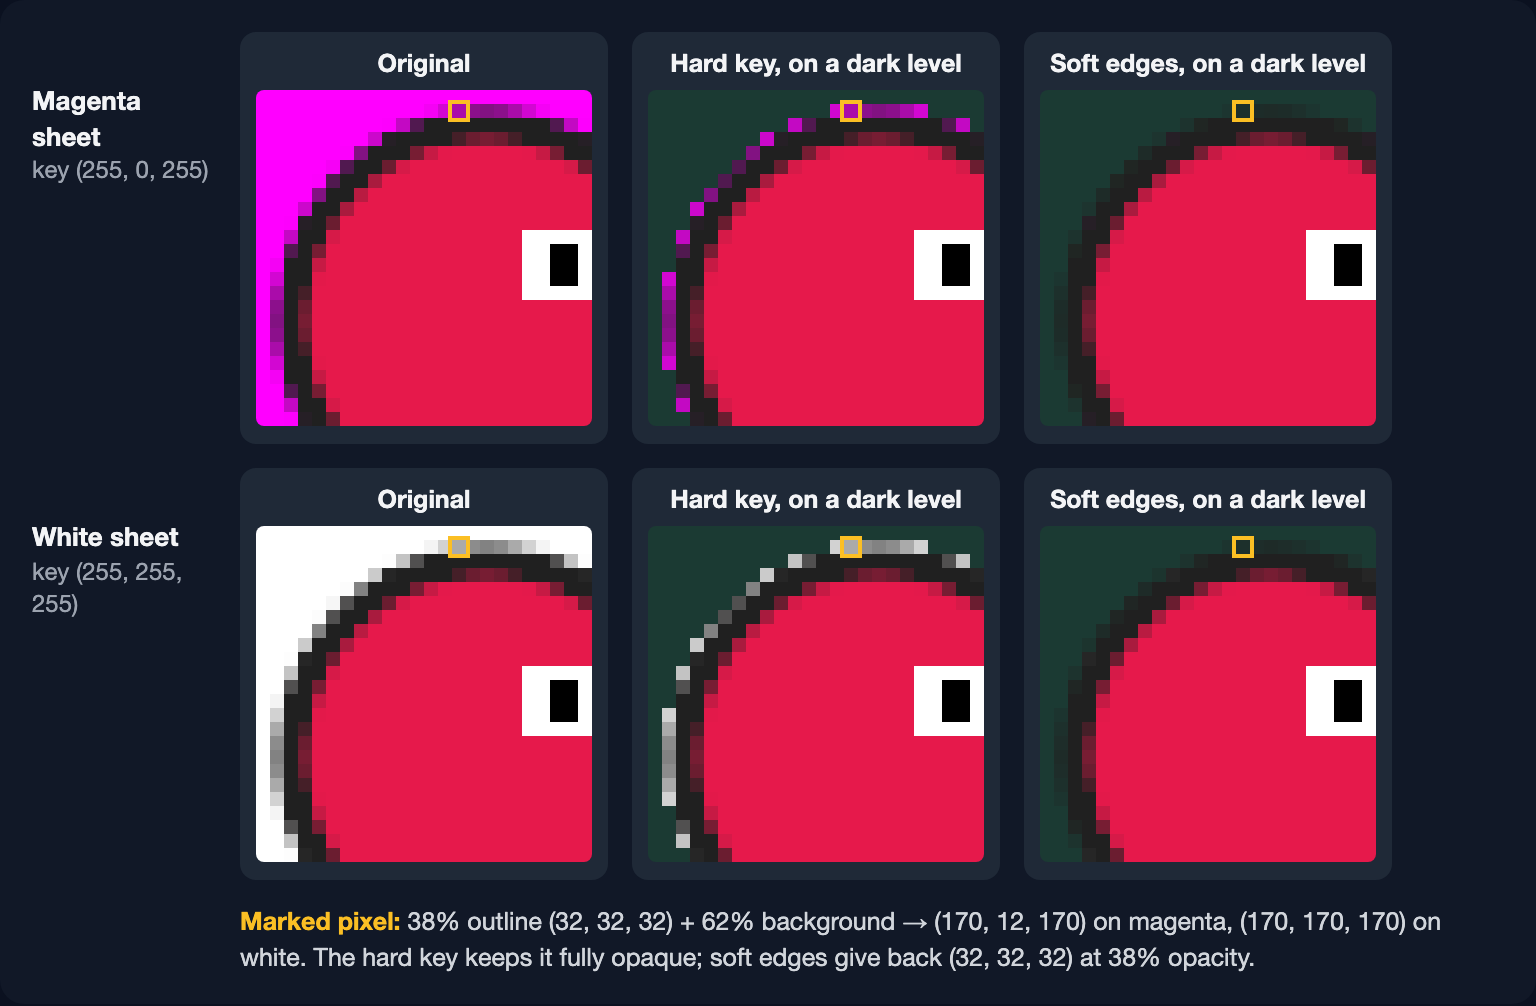
To measure it, we used two test sheets: eight anti-aliased sprites flattened onto magenta and onto white, so the correct transparent result is known exactly. The original sprites have 832 partly transparent edge pixels. A hard key — Remove Background with soft edges switched off — at the default tolerance left 608 of them fully opaque, and 256 of those are more background than sprite. That's the halo you see.
Tolerance is a trade-off, not a fix
The natural reaction is to raise the tolerance. In SpritePilot's Remove Background, a pixel matches the key when its RGB distance from the key color is at most the tolerance × √3, so the default of 30 allows a distance of 52 — about 30 levels in each channel. Here is what higher values did to the magenta sheet, with soft edges switched off:
| Tolerance | Halo pixels (mostly background, still opaque) | Edge pixels left fully opaque (of 832) | Sprite pixels lost with "This color everywhere" |
|---|---|---|---|
| 30 | 256 | 608 | 0 |
| 60 | 64 | 416 | 480 |
| 90 | 0 | 352 | 964 |
| 120 | 0 | 192 | 1,480 |
The halo shrinks, but every edge pixel is still either deleted or kept at full strength. The 38% outline pixel only goes away from a tolerance of 70, and then it disappears completely, so outlines get thinner and more jagged while the pixels that remain keep their tint.
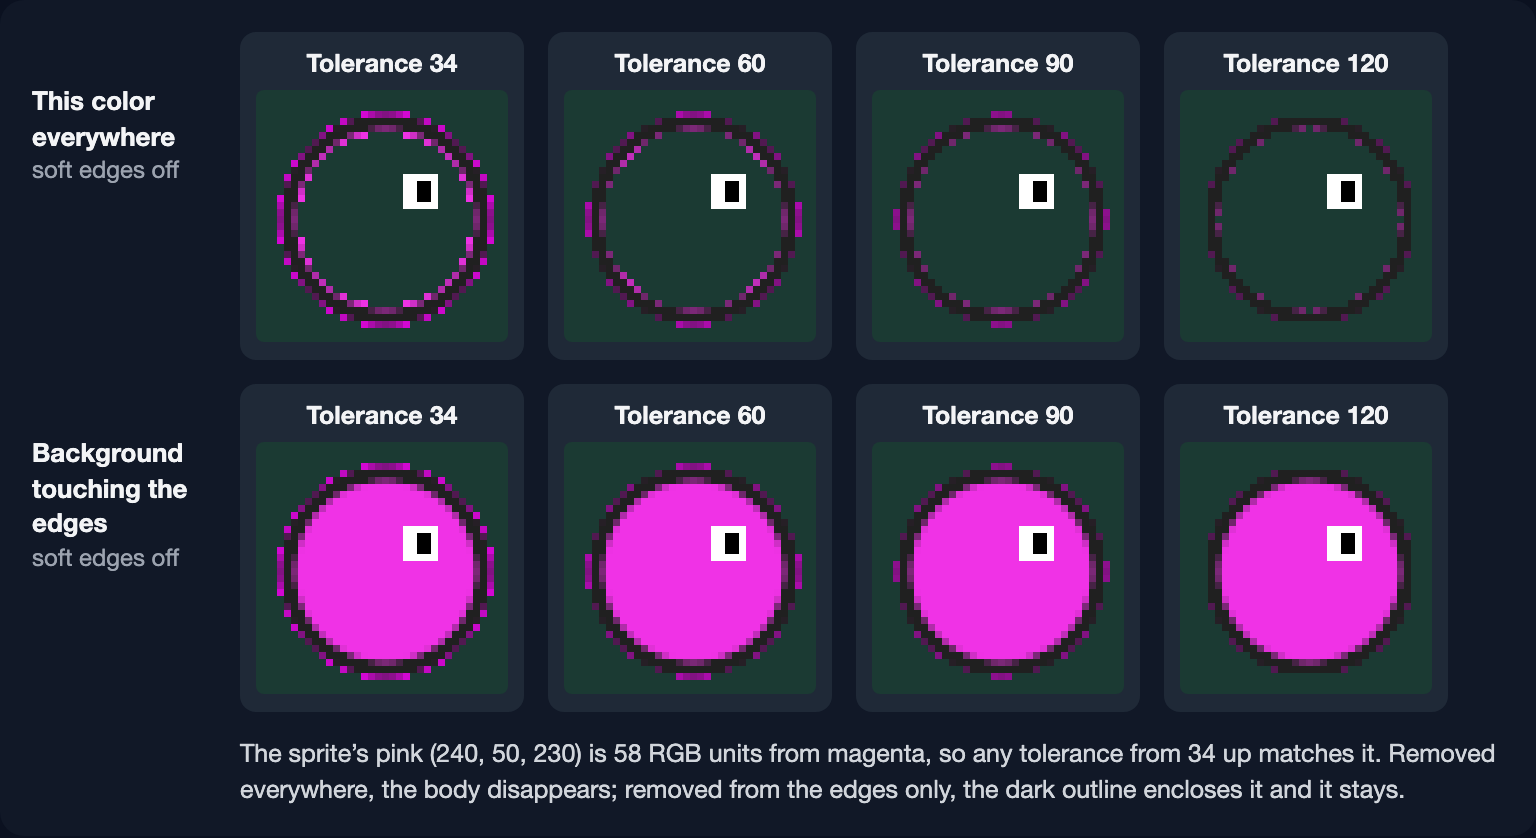
Higher tolerances also start to match the sprites' own colors. The pink sprite, (240, 50, 230), is only 58 units from magenta, so any tolerance from 34 up matches it; the purple one matches from 79 and the red one from 106. Removed everywhere, their bodies vanish:
Edges only, or everywhere?
That bottom row is the second setting that matters. The tool's default, Background touching the edges, starts at every pixel on the border of the image and spreads through matching pixels, like a magic wand clicked all around the edge. Color enclosed by a sprite's outline is never reached, so it stays. The fill moves only up, down, left and right — never diagonally — so it can't slip through the diagonal steps of a one-pixel outline.
That's how white eyes survive on a white sheet:
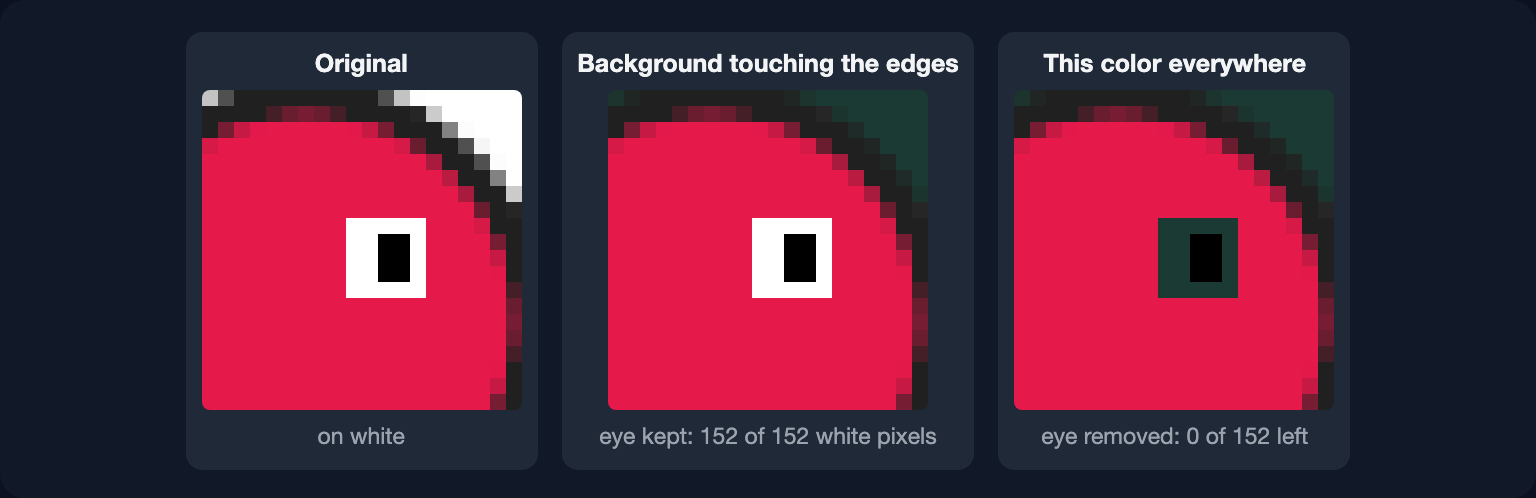
The tool tells you when it has kept matching pixels — "152 pixels of this color are enclosed inside shapes and were kept" — so you can decide. Switch to This color everywhere only when the background really does show through closed holes, like the middle of a ring or a gap between an arm and a body.
Edge mode protects colors only when something encloses them. A sprite with no outline, whose own edge is close to the key color, can still be eaten from the outside.
What soft edges do
The Soft edges option (on by default) doesn't delete or keep edge pixels; it estimates how much of each one was sprite and rebuilds it:
- It starts at the kept pixels that touch the removed background and works inward, at most 3 pixels, only through pixels that turn out to be part background. A solid outline stops it, so a sprite's interior is never touched.
- A pixel whose color carries on into the sprite — a nearly identical neighbor that isn't on the edge — is solid paint and stays as it is.
- Otherwise it looks within 2 pixels for a stronger sprite color that explains the pixel as a blend of that color and the background, allowing a little for rounding and compression. How far the pixel sits along that blend is its coverage.
- Coverage of 92% or more counts as solid. Below that, the coverage becomes the pixel's opacity, and the background is subtracted from its color: (pixel − background) ÷ coverage + background.
- A pixel that no blend explains but that is just outside the tolerance fades from transparent to opaque across a narrow band — that catches JPEG specks.
For the marked pixel above, that gives an opacity of 97 out of 255 (38%) and the color (32, 32, 32): exactly the original. Across the whole magenta sheet, at the default settings, soft edges left no halo pixels; edge opacity was off by 2.4 levels out of 255 on average, and color by about 1. The white sheet came out almost the same: 2.7 and 1.2.
Crisp pixel art is left alone. On a test sheet with one-pixel outlines, diagonal steps, a near-magenta pink sprite and a magenta gem inside every sprite, the default settings reproduced the original transparent sheet pixel for pixel — and kept the 32 gem pixels, which are enclosed. You only need to switch soft edges off if you want every edge pixel kept exactly as it is, partial pixels included.
Soft edges assume one flat background color. Gradients, textures and heavy JPEG noise won't un-mix cleanly, and glows wider than 3 pixels are only partly restored. For photos or complex backgrounds, use the AI background removal in Sprite Detection instead (that one runs on SpritePilot's server).
A second halo: dark edges in the engine
A clean PNG can still show a dark rim in the game. Fully transparent pixels still store a color — in the PNG that Remove Background saves, it's black, (0, 0, 0, 0) — and when an engine scales or moves a sprite with smooth filtering, it can blend that hidden color into the edge. Two fixes:
- For pixel art, use nearest filtering (see Why Lines Appear Between Your Tiles); nothing gets blended.
- For smooth art, let the engine pad the colors. Godot's import option Fix Alpha Border surrounds opaque areas with pixels of their own color and is on by default, according to the documentation; in Unity, Alpha Is Transparency dilates the color channels for the same reason.
A checklist
- Pick the background from a corner, and check the RGB value the tool shows.
- Keep Background touching the edges unless background shows through closed holes.
- Leave the tolerance low (around 30) and let Soft edges handle the fringe; raise it only for noisy backgrounds, and watch the percentage of removed pixels.
- Check the result zoomed in, on a background unlike the original: dark for a white sheet, light for a magenta one.
- Read the enclosed-pixels message before you switch to This color everywhere.
The click-by-click version is in How to Remove the Background from a Sprite Sheet. The tool runs entirely in your browser, and Send to Sprite Detection takes the cleaned sheet straight on to be split.