Remove a Baked-In Checkerboard From a Sprite Sheet
November 2, 2026 · 6 min read
Test whether checker squares are real pixels, try two measured color-removal passes, and recognize when shared gray colors make recovery destructive.
Open the tool from this article — free, in your browser, no signup.
A baked-in checkerboard can sometimes be removed with two color-removal passes, but only when its colors can be separated from the sprite. In our controlled test, Remove Background recovered a hard-edged green sprite exactly using This color everywhere, tolerance 0, and Soft edges off, once for each gray. The same procedure destroyed a gray sprite with smooth edges. Check whether the squares are actual image pixels first, and keep the original file before trying either pass.
Check whether the checkerboard belongs to the image
A checkerboard behind transparent pixels is just a viewer aid. A checkerboard saved into an image is opaque artwork, even if it was originally meant to represent transparency. Changing a filename to end in PNG does not distinguish those cases; inspect what the pixels do over another background.
Load the image in Sprite Player. For a whole-image check, set Columns and Rows to 1, with zero margin and spacing. Choose Black, then White, under Background. If the squares disappear and the empty areas take the new color, you have real transparency. If the gray squares remain, they are baked into the file. A partly damaged image can contain both transparent patches and opaque checks, so examine the whole area you intend to remove.
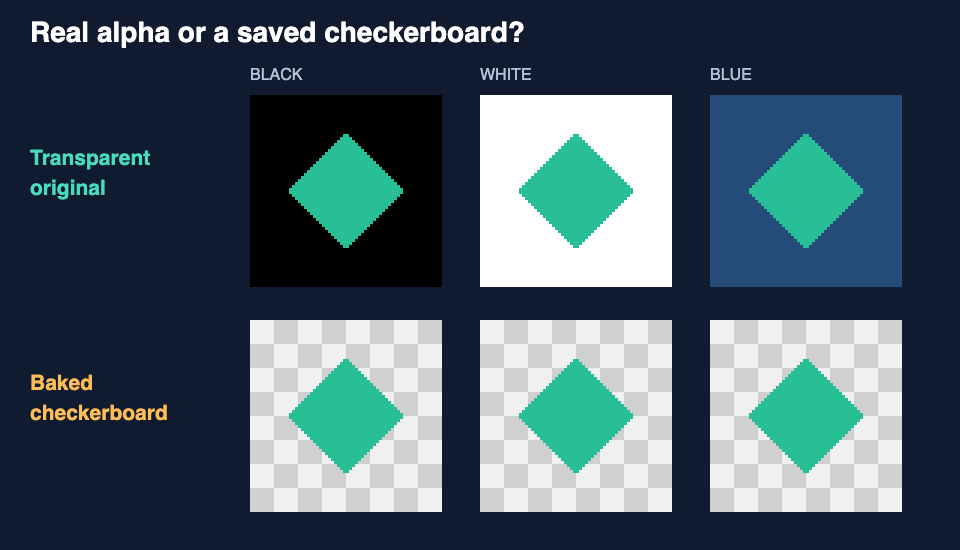
The figure uses a code-drawn 64 × 64 fixture with 8 × 8 checker squares. The two background colors are RGB 240, 240, 240 and 208, 208, 208. The green sprite has 760 visible pixels, all fully opaque, and shares neither color. There are no compression artifacts or partially covered edges in this first test. Those deliberate restrictions make it possible to tell whether removal worked exactly, rather than merely looking acceptable at thumbnail size.
Download the transparent original and the baked version to compare them yourself. The black and white backdrop checks were also performed on the actual downloaded results in Sprite Player; the figure's blue backdrop is an additional code-drawn comparison.


Why edges-only removal leaves squares
Remove Background is a single-color remover, not a checker-pattern recognizer. Its default Background touching the edges mode starts at the image border and spreads through matching pixels. It moves horizontally and vertically, not diagonally. At tolerance 0, the light gray squares do not connect through the darker squares. Many interior light squares therefore stay opaque after a first pass.
For this test, we selected the top-left light gray, downloaded the result, reloaded it, and selected the top-right dark gray for the second pass. Both passes used edges-only mode, tolerance 0, and Soft edges off. The second pass can traverse transparency created by the first, but that does not automatically make every remaining square reachable. 928 background pixels remained visible after both passes. All 760 sprite pixels survived, so this was incomplete background removal, not damaged art.
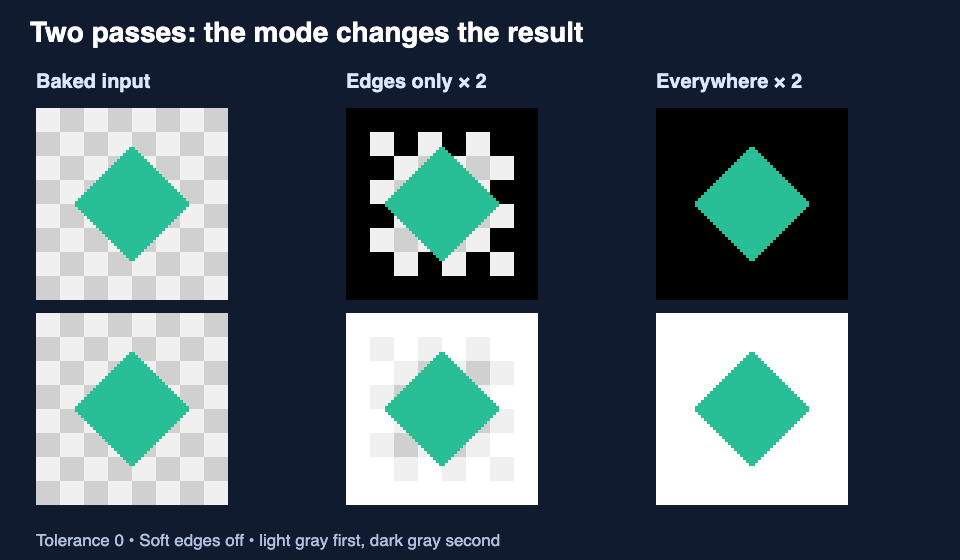
That result is specific to this fixture and pass order. The shape of the sprite, size of the checks, and which squares touch the border affect reachability. Do not assume two passes will clear every checkerboard just because both colors have been selected once.
The two-pass procedure that worked
For the hard-edged green fixture, repeat from the untouched baked file:
- Load it in Remove Background and click Top-left. Confirm the swatch reads
rgb(240, 240, 240). - Under Remove, choose This color everywhere. Set Tolerance to 0 and turn Soft edges off.
- Choose Download Transparent PNG. This saves the first pass; it does not replace the input image inside the tool.
- Load that downloaded PNG. Click Top-right, which is still a dark gray square in this fixture, and confirm
rgb(208, 208, 208). - Keep the same removal mode, tolerance, and Soft edges setting. Download again.
- Inspect the second PNG over both black and white in Sprite Player.
Reloading between passes matters. Selecting another color while the original input remains loaded recalculates from that original, so it replaces the first removal rather than accumulating it. On a different image, sample a remaining opaque square directly from the preview instead of trusting these corner locations. Clicking an already transparent pixel produces a message explaining that there is no color to remove there.
The resulting green PNG after two passes had zero background pixels left, zero sprite pixels lost, and zero changes to visible sprite RGBA values compared with the transparent original. This compares decoded pixels, not PNG file bytes or hidden RGB values under fully transparent pixels.

That is a useful recovery case, but it is not a general promise. Everywhere mode removes matching colors inside the art too. Tolerance 0 was appropriate because these were exact, code-generated flat colors. Increasing tolerance on a noisy screenshot widens the set of colors that will be removed; it does not teach the tool which pixels are character paint.
Repeat with a gray sprite and smooth edges
The second fixture uses the same checks but a sprite body colored RGB 208, 208, 208: exactly one checker color. It also has a narrow, partially transparent edge in the original. Flattening blends that edge into whichever square lies underneath. You can download its transparent reference and baked input.


This original has 924 pixels with nonzero alpha. We ran the same light-then-dark, everywhere-mode procedure at tolerance 0, first with Soft edges off and then with it on for both passes.
| Two-pass settings | Background pixels left | Visible sprite pixels erased | Sprite pixels with altered alpha |
|---|---|---|---|
| Soft edges off | 0 | 768 of 924 | 924 of 924 |
| Soft edges on | 0 | 792 of 924 | 924 of 924 |
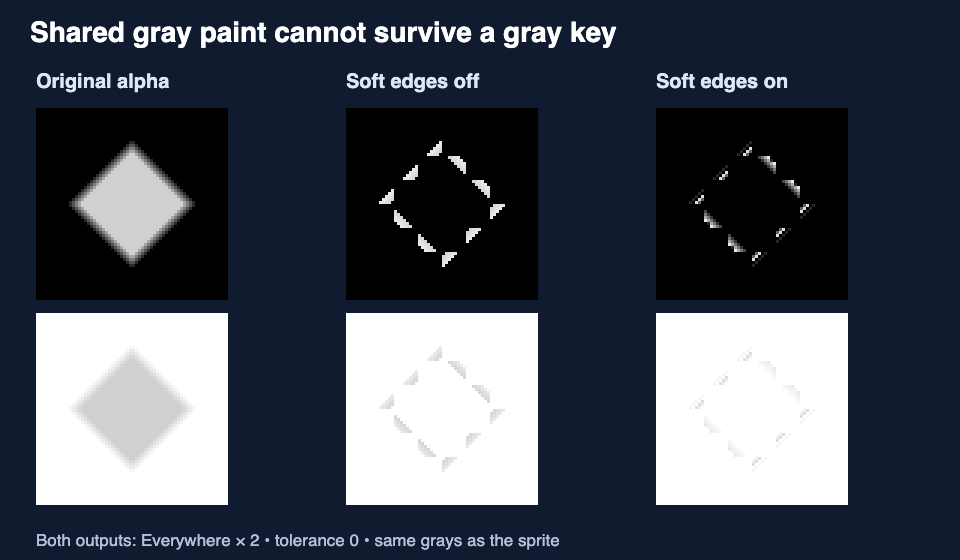
A completely cleared background can therefore be a failed result. The tool's transparent-pixel percentage measures removal, not correctness. Here, the large increase includes sprite pixels that should have stayed visible. The surviving edge fragments are not a recovered sprite, even if some nearly disappear against white.
Soft edges is designed to estimate blends around a removed flat color. It has no original alpha mask to consult and no understanding of which gray areas belong to the character. The halo article explains where that option helps on a single-color background; a checkerboard with shared paint colors is a different problem.
Know when to stop
Stop if a pass makes eyes, highlights, body paint, or outline segments disappear, or if the surviving edge changes drastically between black and white. Return to the untouched input before another experiment. A second pass cannot reconstruct pixels already erased by the first, and raising tolerance can make the damage harder to notice by deleting the evidence around it.
The best route for the gray fixture is the original transparent file, which the reference demonstrates intact on both backgrounds. For a real asset, look for the original download rather than a screenshot of its preview. If that source is unavailable, recovering the silhouette requires additional information or deliberate editing; this two-color procedure has not recovered it reliably. There is no tested “magic tolerance” to recommend for this case.
Keep the passing green result as a narrow example: distinct flat colors, hard edges, and pixel comparison against known alpha. Use the background-removal guide for the controls, and treat every new checkerboard as a new input to inspect, not a preset to apply blindly.