MP4 to Sprite Sheet: Keep Fast Motion in the Sampled Frames
November 8, 2026 · 6 min read
A numbered MP4 test shows why 6 FPS misses a brief impact, what 12 and 24 FPS retain, and when extending the source hold helps more than playback speed.
Open the tool from this article — free, in your browser, no signup.
To keep fast motion when converting an MP4 to a sprite sheet, increase Frames per second to sample, then click Extract Frames again and inspect the actual captured poses. Changing playback speed afterward cannot recover an event missing from the sheet. In our numbered test video, 6 sampled FPS missed a 33.3 ms impact completely; 12 and 24 FPS each captured it once. Extending the impact in the source also made it survive the 6 FPS conversion.
A video with a known short event
The test MP4 is one second long, 160 × 96 pixels, and contains 60 source frames. Each code-drawn frame has a visible decimal counter, a moving green marker, and a small binary counter used to check the exported pixels automatically. The counter starts at 0. The amber impact appears only in source frames 7 and 8, from 116.7 ms up to, but not including, 150 ms.
The source frames were encoded with FFmpeg into an H.264 MP4. The test was run in Chromium through SpritePilot's local Video → Sprite Sheet tool. We downloaded each resulting PNG and JSON and read the counters back from the PNG, rather than assuming that a requested sampling time guaranteed a particular picture. All frame-ID sequences below are measured output from that run.
This fixture separates two questions. Does the animation retain enough positions to show the marker moving smoothly? Does it retain even one picture of the brief impact? A sheet can answer the first reasonably well while failing the second entirely. A small spark, hit flash, or foot-contact pose may disappear even when the surrounding movement still makes sense.
Hold the image size constant
Load the test MP4 and set Frame size to 100% · 160 × 96 px. Run three conversions with Frames per second to sample set to 6, 12, and 24, clicking Extract Frames for each. Use Columns: 6 for the resulting sheets so that these particular frame counts fill complete rows.
The tool's setting is a sampling rate, not a request to change the source video's own frame rate. Keeping Frame size fixed isolates which moments survive. Auto may choose a smaller frame size for a larger source; that is useful for fitting a sheet, but it would introduce a separate visual change into this comparison. The video conversion guide covers the ordinary upload and export steps.
| Sampling rate | Captured frames | Sheet dimensions | Impact captured? |
|---|---|---|---|
| 6 FPS | 6 | 960 × 96 | No |
| 12 FPS | 12 | 960 × 192 | Yes: output frame 2, source ID 7 |
| 24 FPS | 24 | 960 × 384 | Yes: output frame 4, source ID 8 |
Here, “output frame” counts from one as a reader sees the thumbnail list; “source ID” is the number drawn into the video, starting from zero. Recording both avoids a misleading off-by-one argument when comparing the converter to the original clip.
Where the samples land
SpritePilot samples the midpoint of each sampling interval. For an output frame index i starting at zero and sampling rate fps, the nominal time is (i + 0.5) / fps seconds. For this one-second clip, none of the tested samples needs the end-of-video clamp. For MP4 files with readable frame timestamps, the implementation identifies the source frame covering that time and seeks within that source frame before drawing it.
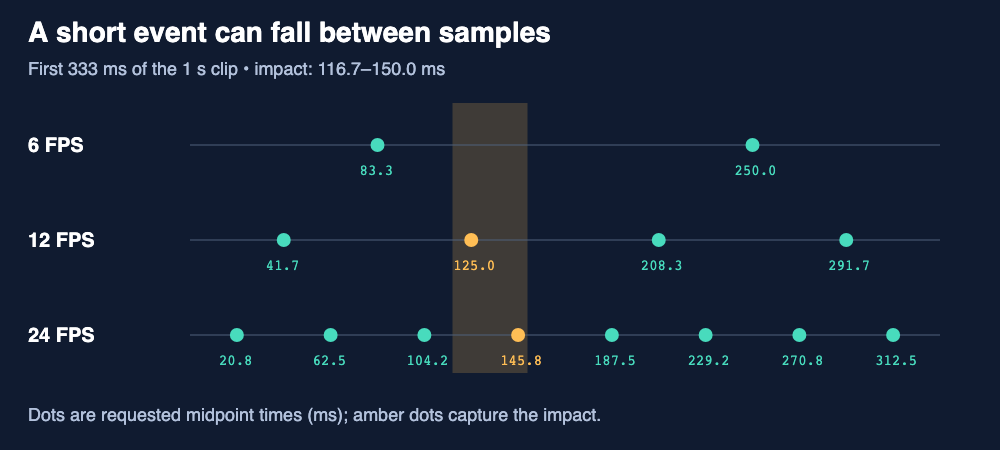
At 6 FPS, the first two requests are approximately 83.3 ms and 250 ms. The impact happens between them. At 12 FPS, a request at 125 ms falls inside source frame 7. At 24 FPS, the request at 145.8 ms falls inside source frame 8. The 24 FPS sample immediately before it, at about 104.2 ms, is still too early.
The measured source IDs were:
- 6 FPS: 5, 15, 25, 35, 45, 55.
- 12 FPS: 2, 7, 12, 17, 22, 27, 32, 37, 42, 47, 52, 57.
- 24 FPS: 1, 3, 6, 8, 11, 13, 16, 18, 21, 23, 26, 28, 31, 33, 36, 38, 41, 43, 46, 48, 51, 53, 56, 58.
Those sequences are not “every tenth frame starting at zero.” The midpoint rule matters, especially for short events near the start of a clip. A different event position can change which rate catches it; doubling a midpoint sampling rate does not preserve the old sample times as a subset.
Inspect the captured pictures
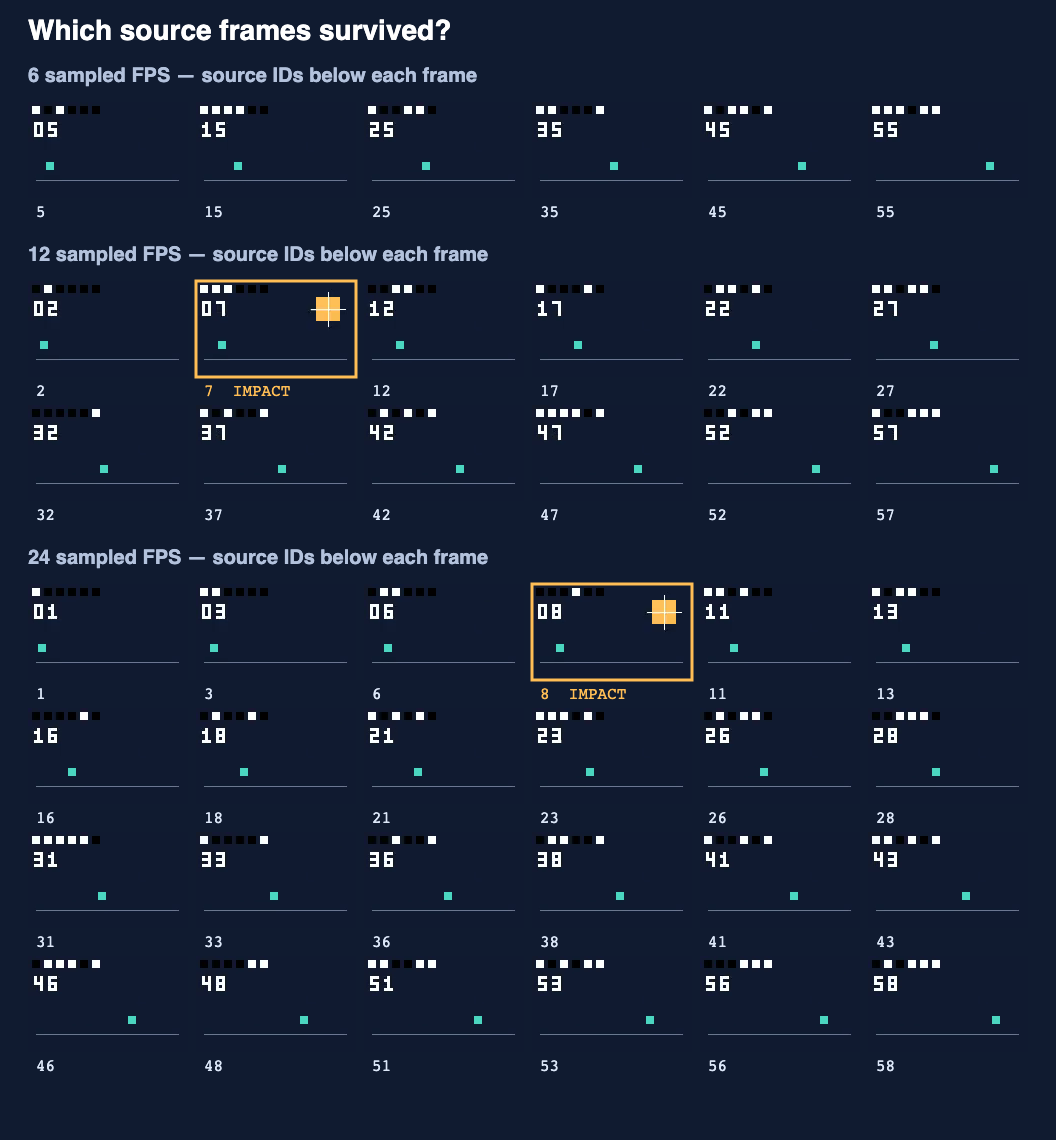
Download the measured 6 FPS sheet, 12 FPS sheet, or 24 FPS sheet. Open one in Sprite Player, use six columns and respectively one, two, or four rows, then set Speed to the sampling rate. Use zero margin and spacing. Each complete sheet then represents approximately one second of playback.

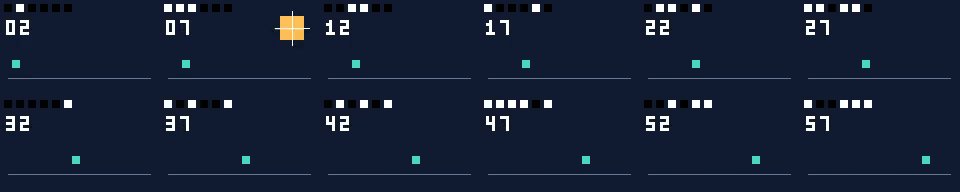
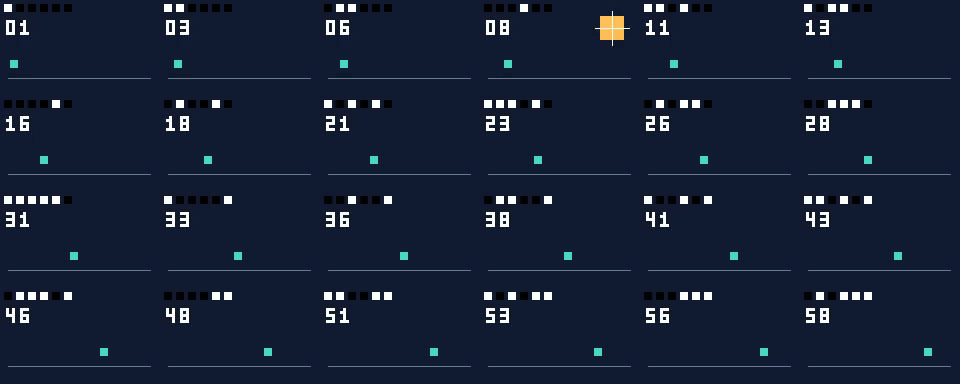
Stepping through the 6 FPS sheet proves that the impact is absent. Playing that sheet at 24 FPS only squeezes its six images into a quarter-second; it cannot invent the missing amber flash. Conversely, playing the 24-frame result at 6 FPS stretches the sequence to four seconds. That is a playback-rate change, not a different extraction.
The single impact picture at 12 FPS occupies one 83.3 ms playback step, while at 24 FPS it occupies about 41.7 ms. Both captured an event that lasted only 33.3 ms in the source. Retaining the pose is therefore different from preserving its exact onset and duration. Judge whether that changed emphasis is appropriate for the animation you need.
Try a longer source hold
The held-impact MP4 keeps the same duration, dimensions, moving marker, and counters, but shows the impact in source frames 5 through 8 instead. That extends the event to 66.7 ms, starting at approximately 83.3 ms. Converted at 6 FPS, the output IDs remain 5, 15, 25, 35, 45, 55, but now the first captured frame contains the impact.
This fixes event coverage by changing what the source presents at a sampled moment. It does not recover the original shorter flash exactly. If you control the source animation, extending a critical pose can be a deliberate readability choice. If you must preserve the source's timing faithfully, prefer more temporal information and verify the result instead of quietly changing the source hold.
The converter permits 1–30 sampled frames per second and extracts at most 300 frames. Those limits are visible in the source and UI. A source event can still fall between samples at the maximum rate; “30 FPS” is not a guarantee that every source frame or short event survives. For longer material, check the truncation warning and prepare a shorter source clip if necessary.
Re-extract before exporting
After changing the sampling rate or Frame size, the tool displays a reminder to click Extract Frames again. The existing result remains the previously extracted frame set until you do. A new number in the settings field is not evidence that the sheet changed. Read the result's frame count and dimensions before choosing Download Sheet + JSON.
The accompanying JSON includes suggestedFps and a duration for each frame. For these video conversions, the suggested rate matches the sampling rate; durations are rounded milliseconds: 167, 83, and 42 at 6, 12, and 24 FPS. They are not timestamps copied from the original video. Using those rounded durations can differ slightly from playback at the exact sampling rate.
Keep a short record of the source event interval, extraction settings, captured source IDs, and intended playback speed. Once event coverage is correct, use GIF or Video to Sprite Sheet Without a Huge File to address size. Reducing dimensions and reducing temporal samples solve different problems; verify the impact again whenever you change the latter.