Free RPG Item Icons for Inventory Screens (CC0)
November 5, 2026 · 7 min read
Download 12 animated RPG inventory icons in 16 and 32 px, free under CC0. Preview the loops, build an inventory, and pack named first frames into an atlas.
Open the tool from this article — free, in your browser, no signup.
Download the RPG Items Pack for 12 animated inventory icons, each in 16 × 16 and 32 × 32 pixels. Every icon has eight frames and a suggested speed of 6 fps. The whole-pack ZIP includes both sizes, GIF previews, metadata, a README, and a CC0 license file. You can use and modify the art in free or commercial games without attribution.
These are equipment and loot icons for an inventory, shop, or item description panel. The sword catches a reflection; the bread bobs and releases steam. They are not character equipment layers or attack animations. Here is the exact file inventory, a menu example made from the released art, and a browser workflow for turning the first frames into a named atlas.
What you get
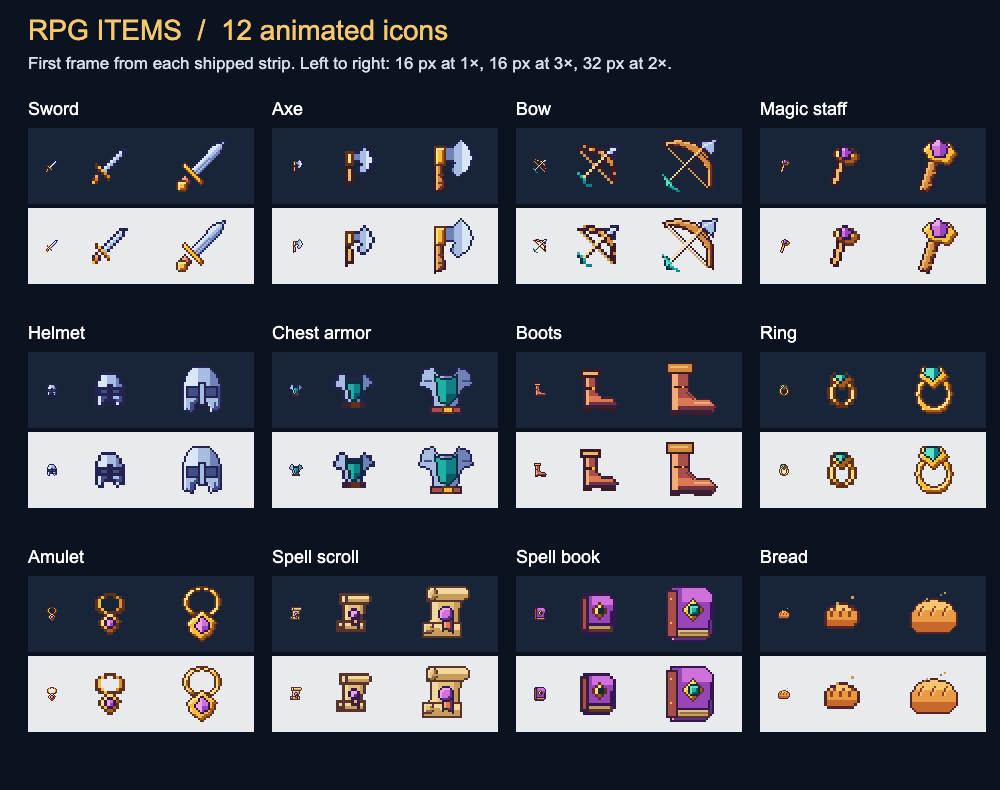
The contact sheet above contains every item. Each row in the following table identifies files by their stable item IDs, which are useful names to keep in your game's item data.
| Category | Item IDs | What animates |
|---|---|---|
| Weapons | sword, axe, bow, magic-staff |
Blade, wood, or crystal reflections and small glints |
| Armor | helmet, chest-armor, boots |
Restrained highlights across metal or leather |
| Jewelry | ring, amulet |
Light around the band or across the pendant |
| Magic supplies | spell-scroll, spell-book |
The wax seal or gold cover ornament glints |
| Food | bread |
A small vertical bob and two steam curls |
All twelve loop. At 6 fps, eight frames take about 1.33 seconds. The two resolutions have the same frame count, but the 16 px drawings simplify details for their smaller grid. Choose one resolution for neighboring inventory cells; use the other where your interface needs a different amount of detail.
Inside the ZIP, the top-level folder is spritepilot-items-pack/:
| Location | Contents | Dimensions |
|---|---|---|
16px/ |
12 PNG strips, such as bow-16px_strip8.png |
128 × 16; eight 16 × 16 cells |
32px/ |
12 PNG strips, such as bow-32px_strip8.png |
256 × 32; eight 32 × 32 cells |
previews/ |
12 animated GIFs and 12 still PNGs | 128 × 128 previews of the 32 px art at 4× |
| Root | items-pack.json, README.txt, LICENSE.txt |
Metadata, usage notes, and license |
That is 51 files, excluding folders. Each strip runs left to right in one row, with no padding between cells and no outer sheet margin. Transparent space inside a cell belongs to the icon's canvas. Preserve that space when slicing so the drawing stays in the same place throughout its loop.
Use the native strips for game assets. The larger GIFs and stills are convenient previews, not an extra native resolution. The JSON's item array is named effects, following the shared pack format; it records IDs, frame counts, speeds, loop flags, and sheet paths. It is a pack manifest, not a combined texture atlas or an inventory database.
Why the shapes matter in a menu
A highlight can draw attention, but the resting picture still needs to identify the item. The bow uses diagonal wooden limbs and a nocked arrow whose shaft crosses the string. Its arrowhead and teal fletching help separate it from the sword. The axe has a broad crescent blade on one side of its exposed handle, giving it a different weight and outline.
The asset named boots depicts one boot in side view. Its tall shaft, folded cuff, heel, and toe pointing right remain visible at 16 px. It can represent an equipped pair without squeezing two narrow drawings into one cell. The ring has an open band, while the amulet has a chain above a hanging stone; their shapes distinguish them even before you compare the teal and violet accents.
The set shares upper-left lighting and dark outlines in each material's hue. That helps the same item work against both backgrounds in the contact sheet. At small sizes, test the silhouette before adding rarity colors, badges, or numbers: an extra badge can cover the very arrowhead or toe that makes an icon recognizable. For the broader color approach, see Limited Color Palettes for Pixel Art.
Build a small inventory from the icons
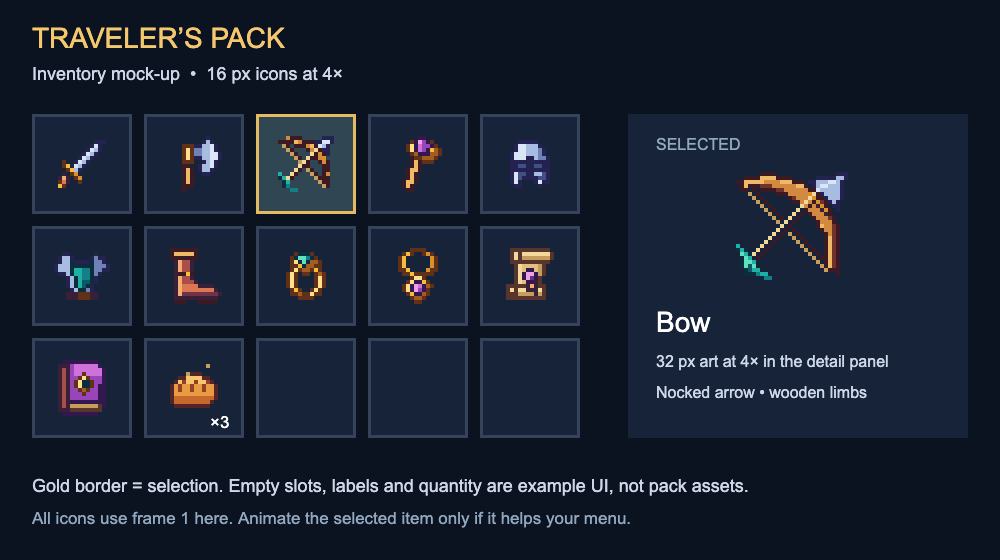
The mock-up above puts the 16 px art at 4× inside equal cells. The selected bow's detail panel uses the 32 px art at 4×. Keeping these two regions separate makes the different pixel densities deliberate. The three empty cells show capacity without inventing additional items, and the bread count sits in the corner rather than covering the loaf.
Keep your item ID, quantity, equipment rules, and display name in game data. A filename such as bow.png should select a picture; it should not decide whether the player can equip a bow. Likewise, the gold selection border belongs to the menu. Baking it into the bow would make the bow look selected wherever that same image appeared.
A quiet menu can show the first frame of every item and animate only the focused item's detail view. Another option is to play all the supplied loops, then judge whether simultaneous glints distract from reading quantities. The pack provides the pictures; focus behavior, selection sounds, and item statistics are yours to implement. Check the layout at its intended display size as well as enlarged.
Check the bow in Sprite Player
On the pack page, find Bow and click Open in Sprite Player. This loads its 32 px strip, sets eight columns and one row, uses 6 fps, enables Loop, and starts playback. Margin and spacing are both zero. For a manual check of the smaller drawing, load bow-16px_strip8.png into Sprite Player with those same settings.
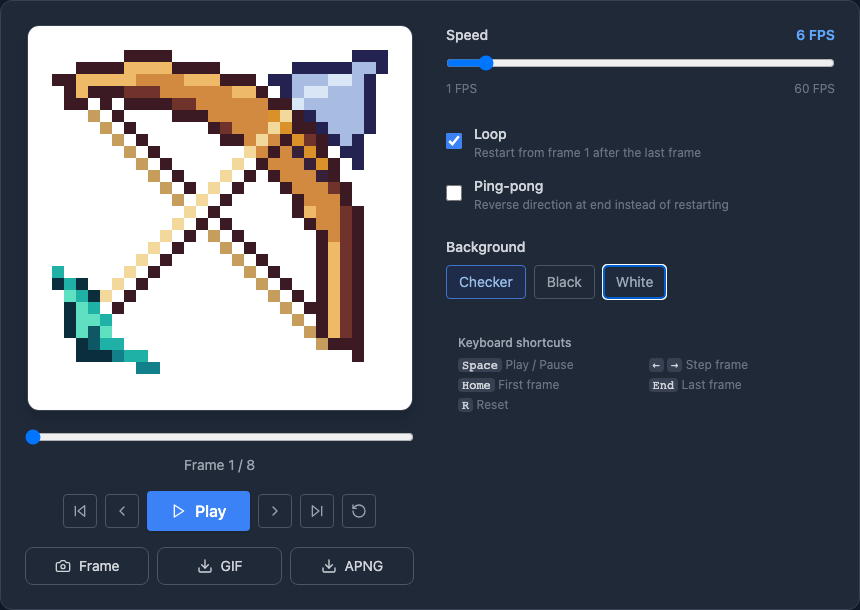
Switch Background between Black and White and watch several loops. Pause, then use the first-frame and next-frame buttons to inspect the arrow and the changing wood highlights. The geometry stays fixed while the light moves. Keep Ping-pong off to check the supplied forward loop, including the transition from frame eight back to frame one.
The Frame button downloads the currently displayed cell as a PNG. On the first frame it saves frame_0001.png; from the 32 px strip, that image is 32 × 32. Rename it bow.png before collecting other items, since each first-frame export starts with the same download name. The Sprite Player guide covers the remaining controls and animation exports.
Pack first frames for a static inventory
For the mock-up's static menu, collect the first 32 px frame of each item and name the files with the IDs in the table: sword.png, axe.png, and so on. This also avoids mistaking the enlarged preview stills for native icons.
- Open Bulk Sprite Sheets and add those twelve PNGs together.
- Choose Simple Grid, Padding 2, and Transparent (no fill) for Background Fill. Leave Max Width and Max Height at 2048.
- Select TexturePacker JSON (Hash) under JSON format and click Generate Sprite Sheet.
- Inspect the twelve packed images, then choose Download PNG + JSON. Keep
sprite-sheet.pngandsprite-sheet.jsontogether.
The exported JSON identifies the bow as bow.png and gives its rectangle in the packed image. A generic inventory renderer can look up that name and draw the specified rectangle. The browser check for this article produced a 134 × 100 atlas with all twelve names and 32 × 32 frame rectangles. Store names rather than assuming that “the third picture” will always be the bow after you add more items.
This makes a static atlas. Adding an entire eight-frame strip to Bulk Sprite Sheets packs that whole strip as one image; it does not split the strip into eight named frames. Keep the original strips for animation, or slice them into separate cells before packing. For packing choices beyond this example, use the separate-images guide.
License and scope
The art is released under CC0 1.0. You may copy, modify, and redistribute it, including commercially, without requesting permission. Credit is optional. Keep LICENSE.txt with your source assets as a record of their terms; CC0 does not imply endorsement of your game.
“RPG” describes the theme. This download contains the strips and previews listed above, not a ready-made RPG Maker IconSet, engine project, or functioning inventory interface. Adapt the files to the layout your project expects. For additional matching asset families, browse Free Game Assets; for a separate set of world pickups and their design notes, see Free Animated Pickup Sprites.